
What the Markup Elements in HTML 5
HTML 5 has introduced various new markup elements, such as footer and article, which help in creating a well-defined structure of a Web page. A well-defined structure describes the layout of a Web page, where the header is placed inside the <header> tag and the content can be placed inside the <article> tag. HTML 5 has also integrated the new features of graphics, such as canvas, which allow you to create different shapes, and media elements, such as audio and video, to run the media files on the Web without using third party plug-ins.
Apart from this, HTML 5 has also added new form elements to improve client-server communication and various input types, such as date and email, to validate the input fields at the runtime of a Web page. In addition to this, some new attributes and events have also been introduced in HTML 5. These new attributes such as content editable and draggable, are used to define the characteristics of HTML elements; whereas, the new events, such as media, form, mouse, and window, are used to define event actions.
In this chapter, you learn about the new elements, such as markup, media, canvas, and form. In addition, you learn about the input type attribute values and the events of elements.
Markup Elements
The markup elements in HTML create a basic structure of an HTML document with the help of predefined tags, such as the <p> tag, which defines a new paragraph on a Web page. In HTML 4 the most commonly used markup element is the div element, which helps in creating sections on a Web page. However, in HTML 5, the new markup elements such as header, footer, section, article, and aside, have replaced the div element.
Below given lists all the new markup elements of HTML 5:
|
Element |
Description |
|---|---|
|
<article> |
Helps in adding content on a Web page, which can be a blog, user-submitted comments, or forum post. |
|
<aside> |
Helps in adding extra information, such as an advertisement, a tip, or a note, on a Web page that can contain navigation links. |
|
<command> |
Helps in adding a command button, such as button, radio button, or check box. This element is placed inside the menu element. |
|
<details> |
Helps in providing an additional detail about a document, which a user can view or hide as and when required. |
|
<summary> |
Helps in defining the caption or summary of the <details>element. |
|
<figure> |
Helps in adding the images, graphs, code listings, and diagrams. |
|
<figcaption> |
Helps in defining the caption for the <figure> element. |
|
<footer> |
Helps in adding the footer in a document. Normally, footer section contains the copyright, name, and contact details. |
|
<header> |
Represents the header in a document. It contains the introduction or heading of a Web page. |
|
<hgroup> |
Allows you to group a set of h1-h6 elements when there are multiple headings, such as subheadings and tag lines. |
|
<mark> |
Helps in highlighting the text in a document. |
|
<meter> |
Specifies the measurements within the range or fractional value. Range can be given with a minimum and maximum value. |
|
<nav> |
Helps in adding the links to the section or document of a Web page. It enables uers to navigate between Web pages. |
|
<progress> |
Enables you to add the progress of a task or function used in JavaScript. It displays the work in progress. |
|
<ruby> |
Defines the ruby annotations, which represent Chinese character used for scripting in East Asia. |
|
<rt> |
Marks the specified ruby text by using ruby annotations (Chinese Characters). |
|
<rp> |
Enables the browsers to support the ruby annotations. You should note that this element is used inside the <ruby> tag. |
|
<section> |
Defines the section for the header, and article in a document. |
|
<time> |
Defines a date and time within an HTML document. |
Let’s do the following steps to create a HTML document using the new markup elements:
Open a blank Notepad document.
Add the code, given in below to the document:
<!DOCTYPE html>
<html>
    <head>
        <title>
            Markup Elements Example
        </title>
    </head>
<body>
    <header>
        <h1>welcome to my homepage</h1>
    </header>

    <hgroup>
        <h2>Learn HTML 5</h2>
        <h3>Creating the group of headings tag</h3>
    </hgroup>

    <nav>
        <a href="http://fastread.in">Fastead</a>
        <a href="About.html">About</a>
    </nav>

    <article>
        <h4><a href="http://www.google.com">Google</a></h4>
        <br>
        Click the link to open the google website.........

        <figure>
            <p><figcaption>This document teaches you to use the new markup elements</figcaption></p>
        <img alt="image 1 displayed" src="C:\Users\Public\Pictures\Sample Pictures\Desert.jpg" height="200px" width="350px"/>
        </figure>
    </article>

    <aside>
        this is an example of creating section on the right side of HTML web page
    </aside>

    <footer>@2016 fastread.in, this document is a sample document</footer>

</body>
</html>
Save to document with an appropriate name and .html extension. In our case, we have named the HTML document as MarkupElements.html.
Open the HTML document in the Web browser. You can see the output of markup elements, as shown in below snapshot:
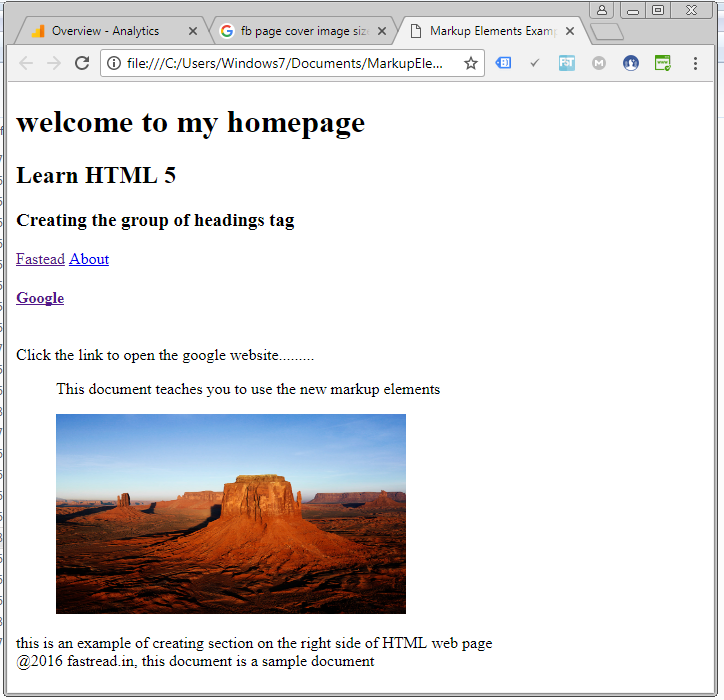
In the snapshot a basic structure of a Web page with the use of markup elements is displayed.
In HTML 5, there are some elements, such as the mark tag, which do not render on Internet Explorer, as compared to Google Chrome and Mozilla Firefox browser. Therefore, to overcome this problem, you need to add the JavasScript code to create a new element. With the use of JavaScript, you can easily render the new elements on the Internet Explorer.
Lets do the following steps to highlight the text in a Web page:
Open a blank Notepad document.
Add the code to the document, as shown in below given:
<!DOCTYPE html>
<html>
<head>
<title> Markup Elements Example </title>
<script> document.createElement("mark")</script>
</head>
<body>
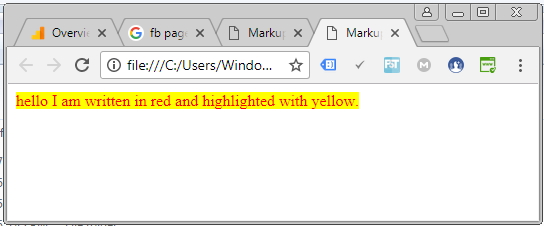
<mark style="color:red;" background-color:yellow;">
hello I am written in red and highlighted with yellow.</mark>
</body>
</html> Save the document with the name of MarkingText.html.
Open the HTML document in the Web browser, as shown in below snapshot
Note: in this chapter, we are using the JavaScript in the examples. You learn more about JavaScript in the tutorial.
Let’s now learn about the new media elements go next button: